
INTRODUCTION
This explores the editing techniques we undertook during the preparation and production stages of creating the trailer and other editing elements used throughout the lead up to our final products. This explains further in depth the editing softwares used such as Final Cut Pro and After Effects CS6. This page also contains Behind The Scenes footage of the filming of the trailer and photo shoot.
ORIGINAL LOGO INTRODUCTION & CREATION TUTORIAL
|
|
|
These videos contain the original logo introduction which is used throughout our videos (excluding the teaser trailer). These also contain a tutorial on how we made our logo introduction on Final Cut Pro X.
MIRROR EFFECT TEST - EDITING TECHNIQUES (PRE-FILMING)

|

|

|
|
|
|
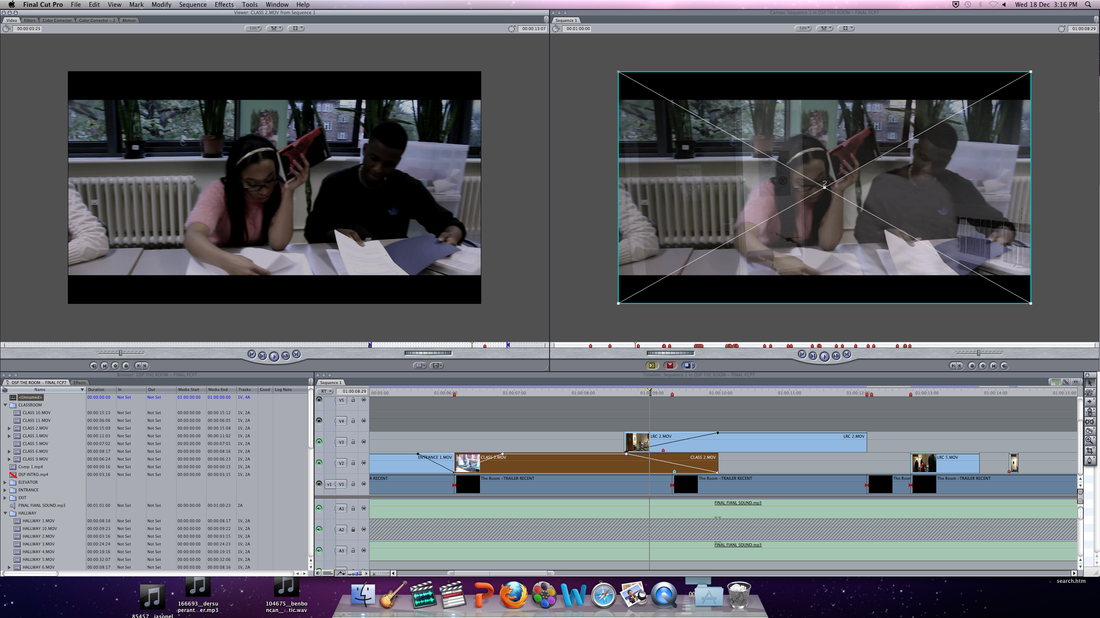
To add to the storyboard and animatic we thought it would be a good idea to test out some of the different editing techniques that we plan to use in our horror film trailer. In this editing test we experimented with the 'Mirror Effect' which is seen in the great horror film 'Mirrors'. This test was unsuccessful in the end but turned out to be helpful in the fact that it taught us how to position the camera and how to make it stable so that mistakes won't happen again. This was also helpful because it gave the editor of the group the chance to enhance their skills and abilities using final cut pro. To create this effect we overlapped two existing videos and cropped another video to sync in the timing of the other. this would idealistically create the illusion that the alternative subject in the mirror has a mind of its own and is not responding to the physical actions of the original subject. This was created using Final Cut Pro X.
Flaws & Improvements:
- Camera was on auto-focus which caused lighting to change drastically, focusing to become dodgy and cropping to become noticeable.
- Need to create line of sight so that I don't accidentally overlap into the other frame to create amateur movements.
- Synchronisation and timing of body movement.
- Watching out for my shadow being in the background. Taken care of during lighting.
CCTV EFFECT TEST - EDITING TECHNIQUES (PRE-FILMING)

|

|

|

|
When creating this 'CCTV Effect' test which is typical of the supernatural/ J-horror genre we used Final Cut Pro X to create the video. Despite the messing around in the beginning half of the video it was helpful in the creation of timing and knowing when to place audio with video at the right time.
When first creating the video we thought it would be a good idea to begin with the production team logo to give the video a sense of branding element. We accompanied the image with an 'earthquake effect' and a 'wolf hound' so that it would seem more professional and stand out more in the beginning so that the viewers will be more likely to remember the production team.
As the actual experimentation of the effect being used in our trailer began at the video time '0:42' we began experimenting with different effects to add to the first one we used being 'black and white' and the 'camcorder' frame. Additional VFX which were added includes 'sidelight', 'vignette' and 'grid'. We experimented with these during different cuts to be able to see which ones worked the best and which ones did not.
The sidelight and vignette worked well because it blurring the edges to allow more focus to be brought to the subject and exposing the brightness further to draw more attention to the subject.
The grid did not work well because it made it seem like too much work and effort was put into the effect and that less is better.
The prism effect effect worked the best because of the distortion effect it displayed around the subject.
I feel that After Effects would have been better to create these effects because they give you more preset VFX to use at your disposal and they look more professional. From this finding, when it comes to creating this scene, we will use After Effects then import it into Final Cut Pro.
Flaws & Improvements:
- There was too many grids, this would only seem effective if there was four and it was a very quick cut.
- The 'camcorder' effect of the frames did not look very realistic.
- Would be better if there was continuous fuzzy movement instead of it only being there during the transitions.
CREATION OF TEASER TRAILER
FINAL CUT PRO 7 & X

The two images above are the logo's for both Final Cut Pro 7 (Left) and Final Cut Pro X (Right). In the creation of our teaser trailer we began by using the more up to date FCP X in our draft versions. However, we decided to change over to use FCP 7 as it was more suitable to use during college hours and allowed us to gain more feedback throughout the creation.

|

|

|
When adjusting the colour correction of our teaser trailer we lowered the saturation of the video so that the subjects would stand out more. As seen in the middle image above it was shown to be effective on the use of the antagonist as it allowed it to stand out and seem more pale which keeps in with the continuity of the poster and magazine. This was also effective overall as we made each footage have a similar tone and shade through the desaturation to keep it continuos throughout the teaser trailer.

|
|

These images show how we overlapped to video footages to create a fade transition so that it would express the passing of time throughout the trailer.
|


When adding effects we also used vignette to darken the edges of the video footages lightly so that it seems feathered. However, within one of the clips we used it slightly more than the rest as we needed to block out the view of a continuity error which we encountered. Although this was unsatisfactory, we were able to pull it off through the fact that it was a very fast clip which gave off a blinking effect to the audiences eyes.
Another effect used was called 'Bad TV' which gave off a fuzzy television look that roles. This was used at the end of our trailer as it would help with the jump scene and due to the fact that it is quite common in horror trailers to be seen. This use was effective as it portrayed the desired image we were going for. To finish of the editing we decided to add the 'Widescreen' effect to each of our footages so that we would achieve a more cinematic view and allow the teaser trailer to become more aesthetically pleasing as it would be viewed in the cinemas or imax. |


|
AFTER EFFECTS CS6

|

|

|
|
|


|
When creating the teaser trailer introduction we were originally working from a free template found online which we stripped and re-constructed to suit to our preferred image. We began doing this by deleting unnecessary layers and effects to leave only the clouds in the background and light. We then went on to create our text using our original logo font 'Haunting Attractions' to spell 'DARKSOUL PRODUCTIONS'. Once this was done we added our iconic wolf silhouette to keep within the continuity of our branding. Now that this was done we were able to re add effects that we found suitable.
When deciding to to change the original blue colour scheme to red, we created an adjustment layer so that we could play with the brightness and contrast in the colour correction. Now that this was done, we finished this off with the task of adding a 3D Layer so that it was possible for the wolf to drift along whilst the cloudy background curved into place. This was made possible by changing the camera view so that it would be noticeably visible.
With this finished all that was left is to add the iconic wolf howl which would then be added in the post-production stage of piecing the teaser trailer together.

|

|

|


|
When creating the captions we once again used the help of a free template and began to strip it down to suit our needs and rebuild it. This allowed us to be able to view the textures used and view how they were blended together to create the backdrop.
As the original template was to extravagant we deleted unnecessary layers such as the red blood splatter, lights and glow. We then created an adjustment layer in addition to the darken effect so that the texture would give off a more grunge like image which we would prefer. This was also possible through changing the colour correction to adjust the brightens and contrast to make the texture display a darker tone whilst remaining effective. Finally, we added a vignette effect so that we could minimise the focus of the texture and darken the edges in an oval like shape. We then blurred this effect so that it slowly faded into the center to give focus to that position. |


|

|

|

|

|

|

|
When creating the title caption we also did the same as we did in the caption texture by stripping and rebuilding the texture again with slightly more light so that it remains slightly different whilst keeping in with the continuity. However, when creating the movement of the text we gave it a 3D Layer and rotated it within a key frame so that it gives off the illusion that it is falling into place as it goes along with the soundtrack. When creating the 3D Layer we used the pen tool to center where the text would fall neatly into place whilst having a shaken movement.
This is the final outcome of the the title caption with the audio from the trailers soundtrack.

|
|
Whilst the 'Coming Soon caption' has the same the same texture as the generic captions background we have altered the text. As seen in the video we have given the text 'COMING SOON' a slight shake as it zooms outwards so that it seems distorted whilst remaining subtle. In addition to this we have also given a Typewriter effect to the 'www.darksoulproductionsweebly.com' so that it would be slightly different to the 'COMING SOON', but still have a sense of subtlety to finish off the teaser trailer. This was effective as it fades in towards the end and draws the audiences attention away from the main text of 'COMING SOON.'

|

|

|
When creating the 'Mirror Scene' in the teaser trailer we began by merging two videos together to create the illusion that the antagonist is supernatural.

|


|
We began this by using the pen tool to cut the specified area which was wanted and crop into the other footage. This then enabled us to use the mask tool to create a Mask Path between the two videos and feather the footage down along with the opacity.


|

Once the masking was completed we faced the daunting task of correcting the lighting so that the footage would become realistic. This problem had arisen in the filming stages as the lighting began to ran out of battery power and die out. This meant that we had to use the Colour correction and adjust the brightness and contrast between the two video footages. In addition to this we also had to adjust the vibrance drastically by decreasing it and desaturating the antagonist footage slightly. this allowed the two footages to match more closely and blend within each other more realistically within the teaser trailer.
|
DRAFTS AND FINAL TEASER TRAILER
TEASER TRAILER (DRAFT 1) |
TEASER TRAILER (DRAFT 2) |
|
|
After creating the first draft of our trailer we had been given feedback that we had too many shots of the antagonist. In addition to this we were also told that the captions were too extravagant and needed to be toned down.
After taking this advice on board and making the changes we had an outcome of our second draft which put all the feedback into effect as well as creating additional shots to replace the old ones. However, we then had to transfer the file from Final Cut Pro X to Final Cut Pro 7 so that we could make minor changes and re arrange specific shots to improve the trailers narrative. Once this was done we was able to produce our final trailer which improved certain transitions like in the beginning sequence to blend into each other. In addition to this we also toned down the vignette effect and gave the trailer a widescreen effect so that it would appear more cinematic towards the audience. We also improved the sound of the trailer in the final outcome as it was previously too quiet in the beginning and did not have a montage sequence. |
TEASER TRAILER (FINAL PRODUCT)
This is the final outcome of the teaser trailer after the feedback and adjustments.
BEHIND THE SCENES OF 'THE ROOM' - BTS
This is a video showing the behind the scenes footage of our trailer for viewing purposes. This was created using Final Cut Pro X as it allowed us to put our new found skills to use.
